Secrets
Flyte supports running a variety of tasks, from containers to SQL queries and service calls, and it provides a native Secret construct to request and access secrets.
This example explains how you can access secrets in a Flyte Task. Flyte provides different types of secrets, but for users writing Python tasks, you can only access secure secrets either as environment variables or as a file injected into the running container.
Creating secrets with a secrets manager
Prerequisites
The first step to using secrets in Flyte is to create one on the backend. By default, Flyte uses the K8s-native secrets manager, which we’ll use in this example, but you can also configure different secret managers.
First, we use kubectl to create a secret called user-info with a
user_secret key:
kubectl create secret -n <project>-<domain> generic user-info --from-literal=user_secret=mysecret
Note
Be sure to specify the correct Kubernetes namespace when creating a secret. If you plan on accessing
the secret in the flytesnacks project under the development domain, replace <project>-<domain>
with flytesnacks-development. This is because secrets need to be in the same namespace as the
workflow execution.
Important
The imperative command above is useful for creating secrets in an ad hoc manner, but it may not be the most secure or sustainable way to do so. You can, however, define secrets using a configuration file or tools like Kustomize.
Using secrets in tasks
Note
To clone and run the example code on this page, see the Flytesnacks repo.
Once you’ve defined a secret on the Flyte backend, flytekit exposes a class
called Secrets, which allows you to request a secret
from the configured secret manager:
import os
from typing import Tuple

import flytekit
from flytekit import Secret, task, workflow
from flytekit.testing import SecretsManager
secret = Secret(
    group="<SECRET_GROUP>",
    key="<SECRET_KEY>",
    mount_requirement=Secret.MountType.ENV_VAR,
)
Secrets consists of group, key, and mounting_requirement arguments,
where a secret group can have multiple secrets associated with it.
If the mounting_requirement argument is not specified, the secret will
be injected as an environment variable by default.
In the code below we specify two variables, SECRET_GROUP and
SECRET_NAME, which maps onto the user-info secret that we created
with kubectl above, with a key called user_secret.
SECRET_GROUP = "user-info"
SECRET_NAME = "user_secret"
Now we declare the secret in the secret_requests argument of the
@task decorator. The request tells Flyte to make
the secret available to the task.
The secret can then be accessed inside the task using the
ExecutionParameters object, which is returned by
invoking the flytekit.current_context() function, as shown below.
At runtime, flytekit looks inside the task pod for an environment variable or a mounted file with a predefined name/path and loads the value.
@task(secret_requests=[Secret(group=SECRET_GROUP, key=SECRET_NAME)])
def secret_task() -> str:
    context = flytekit.current_context()
    secret_val = context.secrets.get(SECRET_GROUP, SECRET_NAME)
    print(secret_val)
    return secret_val
Warning
Never print secret values! The example above is just for demonstration purposes.
Note
In case Flyte fails to access the secret, an error is raised.
The
Secretgroup and key are required parameters during declaration and usage. Failure to specify will cause aValueError.
Multiple keys grouped into one secret
In some cases you may have multiple secrets and sometimes, they maybe grouped as one secret in the SecretStore.
For example, In Kubernetes secrets, it is possible to nest multiple keys under the same secret:
kubectl create secret generic user-info \
    --from-literal=user_secret=mysecret \
    --from-literal=username=my_username \
    --from-literal=password=my_password
In this case, the secret group will be user-info, with three available
secret keys: user_secret, username, and password:
USERNAME_SECRET = "username"
PASSWORD_SECRET = "password"
The Secret structure allows passing two fields, matching the key and the group, as previously described:
@task(
    secret_requests=[
        Secret(key=USERNAME_SECRET, group=SECRET_GROUP),
        Secret(key=PASSWORD_SECRET, group=SECRET_GROUP),
    ]
)
def user_info_task() -> Tuple[str, str]:
    context = flytekit.current_context()
    secret_username = context.secrets.get(SECRET_GROUP, USERNAME_SECRET)
    secret_pwd = context.secrets.get(SECRET_GROUP, PASSWORD_SECRET)
    print(f"{secret_username}={secret_pwd}")
    return secret_username, secret_pwd
Warning
Never print secret values! The example above is just for demonstration purposes.
Mounting secrets as files or environment variables
It is also possible to make Flyte mount the secret as a file or an environment variable.
The file type is useful for large secrets that do not fit in environment variables,
which are typically asymmetric keys (like certs, etc). Another reason may be that a
dependent library requires the secret to be available as a file.
In these scenarios you can specify the mount_requirement=Secret.MountType.FILE.
In the following example we force the mounting to be an environment variable:
@task(
    secret_requests=[
        Secret(
            group=SECRET_GROUP,
            key=SECRET_NAME,
            mount_requirement=Secret.MountType.ENV_VAR,
        )
    ]
)
def secret_file_task() -> Tuple[str, str]:
    secret_manager = flytekit.current_context().secrets

    # get the secrets filename
    f = secret_manager.get_secrets_file(SECRET_GROUP, SECRET_NAME)

    # get secret value from an environment variable
    secret_val = secret_manager.get(SECRET_GROUP, SECRET_NAME)

    # returning the filename and the secret_val
    return f, secret_val
These tasks can be used in your workflow as usual
@workflow
def my_secret_workflow() -> Tuple[str, str, str, str, str]:
    x = secret_task()
    y, z = user_info_task()
    f, s = secret_file_task()
    return x, y, z, f, s
Testing with mock secrets
The simplest way to test secret accessibility is to export the secret as an environment variable. There are some helper methods available to do so:
if __name__ == "__main__":
    sec = SecretsManager()
    os.environ[sec.get_secrets_env_var(SECRET_GROUP, SECRET_NAME)] = "value"
    os.environ[sec.get_secrets_env_var(SECRET_GROUP, USERNAME_SECRET)] = "username_value"
    os.environ[sec.get_secrets_env_var(SECRET_GROUP, PASSWORD_SECRET)] = "password_value"
    x, y, z, f, s = my_secret_workflow()
    assert x == "value"
    assert y == "username_value"
    assert z == "password_value"
    assert f == sec.get_secrets_file(SECRET_GROUP, SECRET_NAME)
    assert s == "value"
Using secrets in task templates
For task types that connect to a remote database, you’ll need to specify
secret request as well. For example, for the SQLAlchemyTask
you need to:
Specify the
secret_requestsargument.Configure the
SQLAlchemyConfigto declare which secret maps onto which connection argument.
from flytekit import kwtypes
from flytekitplugins.sqlalchemy import SQLAlchemyTask, SQLAlchemyConfig


# define the secrets
secrets = {
    "username": Secret(group="<SECRET_GROUP>", key="<USERNAME_SECRET>"),
    "password": Secret(group="<SECRET_GROUP>", key="<PASSWORD_SECRET>"),
}


sql_query = SQLAlchemyTask(
    name="sql_query",
    query_template="""SELECT * FROM my_table LIMIT {{ .inputs.limit }}""",
    inputs=kwtypes(limit=int),

    # request secrets
    secret_requests=[*secrets.values()],

    # specify username and password credentials in the configuration
    task_config=SQLAlchemyConfig(
        uri="<DATABASE_URI>",
        secret_connect_args=secrets,
    ),
)
Note
Here the secret_connect_args map to the
SQLAlchemy engine configuration
argument names for the username and password.
You can then use the sql_query task inside a workflow to grab data and
perform downstream transformations on it.
How secrets injection works
The rest of this page describes how secrets injection works under the hood. For a simple task that launches a Pod, the flow would look something like this:
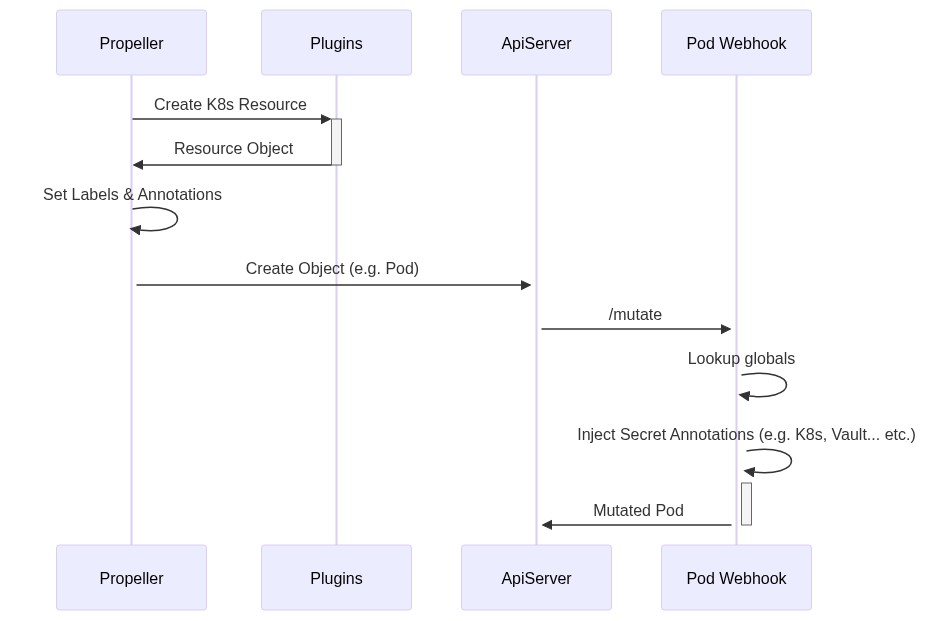
Breaking down this sequence diagram:
Flyte invokes a plugin to create the K8s object. This can be a Pod or a more complex CRD (e.g. Spark, PyTorch, etc.)
Note
The plugin ensures that the labels and annotations are passed to any Pod that is spawned due to the creation of the CRD.
Flyte applies labels and annotations that are referenced to all secrets the task is requesting access to. Note that secrets are not case sensitive.
Flyte sends a
POSTrequest toApiServerto create the object.Before persisting the Pod,
ApiServerinvokes all the registered Pod Webhooks and Flyte’s Pod Webhook is called.Using the labels and annotiations attached in step 2, Flyte Pod Webhook looks up globally mounted secrets for each of the requested secrets.
If found, the Pod Webhook mounts them directly in the Pod. If not found, the Pod Webhook injects the appropriate annotations to load the secrets for K8s (or Vault or Confidant or any secret management system plugin configured) into the task pod.
Once the secret is injected into the task pod, Flytekit can read it using the secret manager.
The webhook is included in all overlays in the Flytekit repo. The deployment file creates two things; a Job and a Deployment.
flyte-pod-webhook-secretsJob: This job runsflytepropeller webhook init-certscommand that issues self-signed CA Certificate as well as a derived TLS certificate and its private key. Ensure that the private key is in lower case, that is,my_tokenin contrast toMY_TOKEN. It stores them into a new secretflyte-pod-webhook-secret.flyte-pod-webhookDeployment: This deployment creates the Webhook pod which creates a MutatingWebhookConfiguration on startup. This serves as the registration contract with the ApiServer to know about the Webhook before it starts serving traffic.
Secret discovery
Flyte identifies secrets using a secret group and a secret key, which can
be accessed by flytekit.current_context() in the task function
body, as shown in the code examples above.
Flytekit relies on the following environment variables to load secrets (defined here). When running tasks and workflows locally you should make sure to store your secrets accordingly or to modify these:
FLYTE_SECRETS_DEFAULT_DIR: The directory Flytekit searches for secret files. Default:"/etc/secrets"FLYTE_SECRETS_FILE_PREFIX: a common file prefix for Flyte secrets. Default:""FLYTE_SECRETS_ENV_PREFIX: a common env var prefix for Flyte secrets. Default:"_FSEC_"
When running a workflow on a Flyte cluster, the configured secret manager will use the secret Group and Key to try and retrieve a secret. If successful, it will make the secret available as either file or environment variable and will if necessary modify the above variables automatically so that the task can load and use the secrets.
Configuring a secret management system plugin
When a task requests a secret, Flytepropeller will try to retrieve secrets in the following order:
Checking for global secrets, i.e. secrets mounted as files or environment variables on the
flyte-pod-webhookpodChecking with an additional configurable secret manager.
Important
The global secrets take precedence over any secret discoverable by the secret manager plugins.
The following secret managers are available at the time of writing:
K8s secrets (default):
flyte-pod-webhookwill try to look for a K8s secret named after the secret Group and retrieve the value for the secret Key.AWS Secret Manager:
flyte-pod-webhookwill add the AWS Secret Manager sidecar container to a task Pod which will mount the secret.Vault Agent Injector :
flyte-pod-webhookwill annotate the task Pod with the respective Vault annotations that trigger an existing Vault Agent Injector to retrieve the specified secret Key from a vault path defined as secret Group.
When using the K8s secret manager plugin, which is enabled by default, the secrets need to be available in the same namespace as the task execution
(for example flytesnacks-development). K8s secrets can be mounted as either files or injected as environment variables into the task pod,
so if you need to make larger files available to the task, then this might be the better option.
Furthermore, this method also allows you to have separate credentials for different domains but still using the same name for the secret.
AWS secrets manager
When using the AWS secret management plugin, secrets need to be specified by naming them in the format
<SECRET_GROUP>:<SECRET_KEY>, where the secret string is a plain-text value, not key/value json.
Vault secrets manager
When using the Vault secret manager, make sure you have Vault Agent deployed on your cluster as described in this step-by-step tutorial.
Vault secrets can only be mounted as files and will become available under "/etc/flyte/secrets/SECRET_GROUP/SECRET_NAME".
Vault comes with various secrets engines. Currently Flyte supports working with both version 1 and 2 of the Key Vault engine <https://developer.hashicorp.com/vault/docs/secrets/kv> as well as the databases secrets engine <https://developer.hashicorp.com/vault/docs/secrets/databases>.
You can use use the group_version parameter to specify which secret backend engine to use. Available choices are: “kv1”, “kv2”, “db”:
Requesting secrets with the Vault secret manager
secret = Secret(
    group="<Vault path>",
    key="<Secret key for KV engine>",
    group_version="<kv1|kv2|db>",
)
The group parameter is used to specify the path to the secret in the Vault backend. For example, if you have a secret stored in Vault at "secret/data/flyte/secret" then the group parameter should be "secret/data/flyte".
When using either of the Key Vault engine versions, the secret key is the name of a specific secret entry to be retrieved from the group path.
When using the database secrets engine, the secret key itself is arbitrary but is required by Flyte to name and identify the secret file. It is arbitrary because the database secrets engine returns always two keys, username and password and we need to retrieve a matching pair in one request.
Configuration
You can configure the Vault role under which Flyte will try to read the secret by setting webhook.vaultSecretManager.role (default: "flyte").
There is also a deprecated webhook.vaultSecretManager.kvVersion setting in the configmap that can be used to specify the version but only for the Key Vault backend engine.
Available choices are: “1”, “2”. Note that the version number needs to be an explicit string (e.g. "1").
Annotations
By default, flyte-pod-webhook injects following annotations to task pod:
vault.hashicorp.com/agent-injectto configure whether injection is explicitly enabled or disabled for a pod.vault.hashicorp.com/secret-volume-pathto configure where on the filesystem a secret will be rendered.vault.hashicorp.com/roleto configure the Vault role used by the Vault Agent auto-auth method.vault.hashicorp.com/agent-pre-populate-onlyto configure whether an init container is the only injected container.vault.hashicorp.com/agent-inject-secretto configure Vault Agent to retrieve the secrets from Vault required by the container.vault.hashicorp.com/agent-inject-fileto configure the filename and path in the secrets volume where a Vault secret will be written.vault.hashicorp.com/agent-inject-templateto configure the template Vault Agent should use for rendering a secret.
It is possible to add extra annotations or override the existing ones in Flyte either at the task level using pod annotations or at the installation level.
If Flyte administrator wants to set up annotations for the entire system, they can utilize webhook.vaultSecretManager.annotations to accomplish this.
Scaling the webhook
Vertical scaling
To scale the Webhook to be able to process the number/rate of pods you need, you may need to configure a vertical pod autoscaler.
Horizontal scaling
The Webhook does not make any external API Requests in response to Pod mutation requests. It should be able to handle traffic quickly. For horizontal scaling, adding additional replicas for the Pod in the
deployment should be sufficient. A single MutatingWebhookConfiguration object will be used, the same TLS certificate will be shared across the pods and the Service created will automatically load balance traffic across the available pods.