Single Node, Single GPU Training
Training a model on a single node on one GPU is as trivial as writing any Flyte task and simply setting the GPU to 1.
As long as the Docker image is built correctly with the right version of the GPU drivers and the Flyte backend is
provisioned to have GPU machines, Flyte will execute the task on a node that has GPU(s).
Currently, Flyte does not provide any specific task type for PyTorch (though it is entirely possible to provide a task-type that supports PyTorch-Ignite or PyTorch Lightning support, but this is not critical). One can request for a GPU, simply by setting GPU=”1” resource request and then at runtime, the GPU will be provisioned.
In this example, we’ll see how we can create any PyTorch model, train it using Flyte and a specialized container. The following video will outline the basics of this process.
First, let’s import the libraries.
import json
import os
import typing
from dataclasses import dataclass

import torch
import torch.nn.functional as F
import wandb
from dataclasses_json import dataclass_json
from flytekit import Resources, task, workflow
from flytekit.types.file import PythonPickledFile
from torch import distributed as dist
from torch import nn, optim
from torchvision import datasets, transforms
Let’s define some variables to be used later. The following variables are specific to wandb:
NUM_BATCHES_TO_LOG: Number of batches to log from the test data for each test stepLOG_IMAGES_PER_BATCH: Number of images to log per test batch
NUM_BATCHES_TO_LOG = 10
LOG_IMAGES_PER_BATCH = 32
If running remotely, copy your wandb API key to the Dockerfile under the environment variable WANDB_API_KEY.
This function logs into wandb and initializes the project. If you built your Docker image with the
WANDB_USERNAME, this will work. Otherwise, replace my-user-name with your wandb user name.
We’ll call this function in the pytorch_mnist_task defined below.
def wandb_setup():
    wandb.login()
    wandb.init(
        project="mnist-single-node-single-gpu",
        entity=os.environ.get("WANDB_USERNAME", "my-user-name"),
    )
Creating the Network
We use a simple PyTorch model with torch.nn.Conv2d and torch.nn.Linear layers.
Let’s also use torch.nn.functional.relu(), torch.nn.functional.max_pool2d(), and
torch.nn.functional.relu() to define the forward pass.
class Net(nn.Module):
    def __init__(self):
        super(Net, self).__init__()
        self.conv1 = nn.Conv2d(1, 20, 5, 1)
        self.conv2 = nn.Conv2d(20, 50, 5, 1)
        self.fc1 = nn.Linear(4 * 4 * 50, 500)
        self.fc2 = nn.Linear(500, 10)

    def forward(self, x):
        x = F.relu(self.conv1(x))
        x = F.max_pool2d(x, 2, 2)
        x = F.relu(self.conv2(x))
        x = F.max_pool2d(x, 2, 2)
        x = x.view(-1, 4 * 4 * 50)
        x = F.relu(self.fc1(x))
        x = self.fc2(x)
        return F.log_softmax(x, dim=1)
The Data Loader
def mnist_dataloader(batch_size, train=True, **kwargs):
    return torch.utils.data.DataLoader(
        datasets.MNIST(
            "./data",
            train=train,
            download=True,
            transform=transforms.Compose([transforms.ToTensor(), transforms.Normalize((0.1307,), (0.3081,))]),
        ),
        batch_size=batch_size,
        shuffle=True,
        **kwargs,
    )
Training
We define a train function to enclose the training loop per epoch, i.e., this gets called for every successive epoch.
Additionally, we log the loss and epoch progression, which can later be visualized in a wandb dashboard.
def train(model, device, train_loader, optimizer, epoch, log_interval):
    model.train()

    # hooks into the model to collect gradients and the topology
    wandb.watch(model)

    # loop through the training batches
    for batch_idx, (data, target) in enumerate(train_loader):
        data, target = data.to(device), target.to(device)  # device conversion
        optimizer.zero_grad()  # clear gradient
        output = model(data)  # forward pass
        loss = F.nll_loss(output, target)  # compute loss
        loss.backward()  # propagate the loss backward
        optimizer.step()  # update the model parameters

        if batch_idx % log_interval == 0:
            print(
                "Train Epoch: {} [{}/{} ({:.0f}%)]\tloss={:.4f}".format(
                    epoch,
                    batch_idx * len(data),
                    len(train_loader.dataset),
                    100.0 * batch_idx / len(train_loader),
                    loss.item(),
                )
            )

            # log epoch and loss
            wandb.log({"loss": loss, "epoch": epoch})
We define a test logger function which will be called when we run the model on test dataset.
def log_test_predictions(images, labels, outputs, predicted, my_table, log_counter):
    """
    Convenience function to log predictions for a batch of test images
    """

    # obtain confidence scores for all classes
    scores = F.softmax(outputs.data, dim=1)

    # assign ids based on the order of the images
    for i, (image, pred, label, score) in enumerate(
        zip(*[x.cpu().numpy() for x in (images, predicted, labels, scores)])
    ):
        # add required info to data table: id, image pixels, model's guess, true label, scores for all classes
        my_table.add_data(f"{i}_{log_counter}", wandb.Image(image), pred, label, *score)
        if i == LOG_IMAGES_PER_BATCH:
            break
Evaluation
We define a test function to test the model on the test dataset.
We log accuracy, test_loss, and a wandb table.
The wandb table can help in depicting the model’s performance in a structured format.
def test(model, device, test_loader):
    # ``wandb`` tabular columns
    columns = ["id", "image", "guess", "truth"]
    for digit in range(10):
        columns.append("score_" + str(digit))
    my_table = wandb.Table(columns=columns)

    model.eval()

    # hooks into the model to collect gradients and the topology
    wandb.watch(model)

    test_loss = 0
    correct = 0
    log_counter = 0

    # disable gradient
    with torch.no_grad():

        # loop through the test data loader
        for images, targets in test_loader:
            images, targets = images.to(device), targets.to(device)  # device conversion
            outputs = model(images)  # forward pass -- generate predictions
            test_loss += F.nll_loss(outputs, targets, reduction="sum").item()  # sum up batch loss
            _, predicted = torch.max(outputs.data, 1)  # get the index of the max log-probability
            correct += (predicted == targets).sum().item()  # compare predictions to true label

            # log predictions to the ``wandb`` table
            if log_counter < NUM_BATCHES_TO_LOG:
                log_test_predictions(images, targets, outputs, predicted, my_table, log_counter)
                log_counter += 1

    # compute the average loss
    test_loss /= len(test_loader.dataset)

    print("\naccuracy={:.4f}\n".format(float(correct) / len(test_loader.dataset)))
    accuracy = float(correct) / len(test_loader.dataset)

    # log the average loss, accuracy, and table
    wandb.log({"test_loss": test_loss, "accuracy": accuracy, "mnist_predictions": my_table})

    return accuracy
Hyperparameters
We define a few hyperparameters for training our model.
@dataclass_json
@dataclass
class Hyperparameters(object):
    """
    Args:
        backend: pytorch backend to use, e.g. "gloo" or "nccl"
        sgd_momentum: SGD momentum (default: 0.5)
        seed: random seed (default: 1)
        log_interval: how many batches to wait before logging training status
        batch_size: input batch size for training (default: 64)
        test_batch_size: input batch size for testing (default: 1000)
        epochs: number of epochs to train (default: 10)
        learning_rate: learning rate (default: 0.01)
    """

    backend: str = dist.Backend.GLOO
    sgd_momentum: float = 0.5
    seed: int = 1
    log_interval: int = 10
    batch_size: int = 64
    test_batch_size: int = 1000
    epochs: int = 10
    learning_rate: float = 0.01
Training and Evaluating
The output model using torch.save() saves the state_dict as described
in pytorch docs.
A common convention is to have the .pt extension for the model file.
Note
Note the usage of requests=Resources(gpu="1"). This will force Flyte to allocate this task onto a machine with GPU(s).
The task will be queued up until a machine with GPU(s) can be procured. Also, for the GPU Training to work, the
Dockerfile needs to be built as explained in the PyTorch Dockerfile for Deployment section.
TrainingOutputs = typing.NamedTuple(
    "TrainingOutputs",
    epoch_accuracies=typing.List[float],
    model_state=PythonPickledFile,
)
Set memory, gpu and storage depending on whether we are trying to register against sandbox or not…
if os.getenv("SANDBOX") != "":
    print(f"SANDBOX ENV: '{os.getenv('SANDBOX')}'")
    mem = "100Mi"
    gpu = "0"
else:
    print(f"SANDBOX ENV: '{os.getenv('SANDBOX')}'")
    mem = "3Gi"
    gpu = "1"


@task(
    retries=2,
    cache=True,
    cache_version="1.0",
    requests=Resources(gpu=gpu, mem=mem),
    limits=Resources(gpu=gpu, mem=mem),
)
def pytorch_mnist_task(hp: Hyperparameters) -> TrainingOutputs:
    wandb_setup()

    # store the hyperparameters' config in ``wandb``
    wandb.config.update(json.loads(hp.to_json()))

    # set random seed
    torch.manual_seed(hp.seed)

    # ideally, if GPU training is required, and if cuda is not available, we can raise an exception
    # however, as we want this algorithm to work locally as well (and most users don't have a GPU locally), we will fallback to using a CPU
    use_cuda = torch.cuda.is_available()
    print(f"Use cuda {use_cuda}")
    device = torch.device("cuda" if use_cuda else "cpu")

    # load data
    kwargs = {"num_workers": 1, "pin_memory": True} if use_cuda else {}
    training_data_loader = mnist_dataloader(hp.batch_size, train=True, **kwargs)
    test_data_loader = mnist_dataloader(hp.batch_size, train=False, **kwargs)

    # train the model
    model = Net().to(device)

    optimizer = optim.SGD(model.parameters(), lr=hp.learning_rate, momentum=hp.sgd_momentum)

    # run multiple epochs and capture the accuracies for each epoch
    # train the model: run multiple epochs and capture the accuracies for each epoch
    accuracies = []
    for epoch in range(1, hp.epochs + 1):
        train(model, device, training_data_loader, optimizer, epoch, hp.log_interval)
        accuracies.append(test(model, device, test_data_loader))

    # after training the model, we can simply save it to disk and return it from the Flyte task as a {py:class}`flytekit.types.file.FlyteFile`
    # type, which is the ``PythonPickledFile``. ``PythonPickledFile`` is simply a decorator on the ``FlyteFile`` that records the format
    # of the serialized model as ``pickled``
    model_file = "mnist_cnn.pt"
    torch.save(model.state_dict(), model_file)

    return TrainingOutputs(epoch_accuracies=accuracies, model_state=PythonPickledFile(model_file))
Finally, we define a workflow to run the training algorithm. We return the model and accuracies.
@workflow
def pytorch_training_wf(hp: Hyperparameters = Hyperparameters(epochs=10, batch_size=128)) -> TrainingOutputs:
    return pytorch_mnist_task(hp=hp)
Running the Model Locally
It is possible to run the model locally with almost no modifications (as long as the code takes care of resolving if the code is distributed or not). This is how we can do it:
if __name__ == "__main__":
    model, accuracies = pytorch_training_wf(hp=Hyperparameters(epochs=10, batch_size=128))
    print(f"Model: {model}, Accuracies: {accuracies}")
Weights & Biases Report
Lastly, let’s look at the reports that are generated by the model.
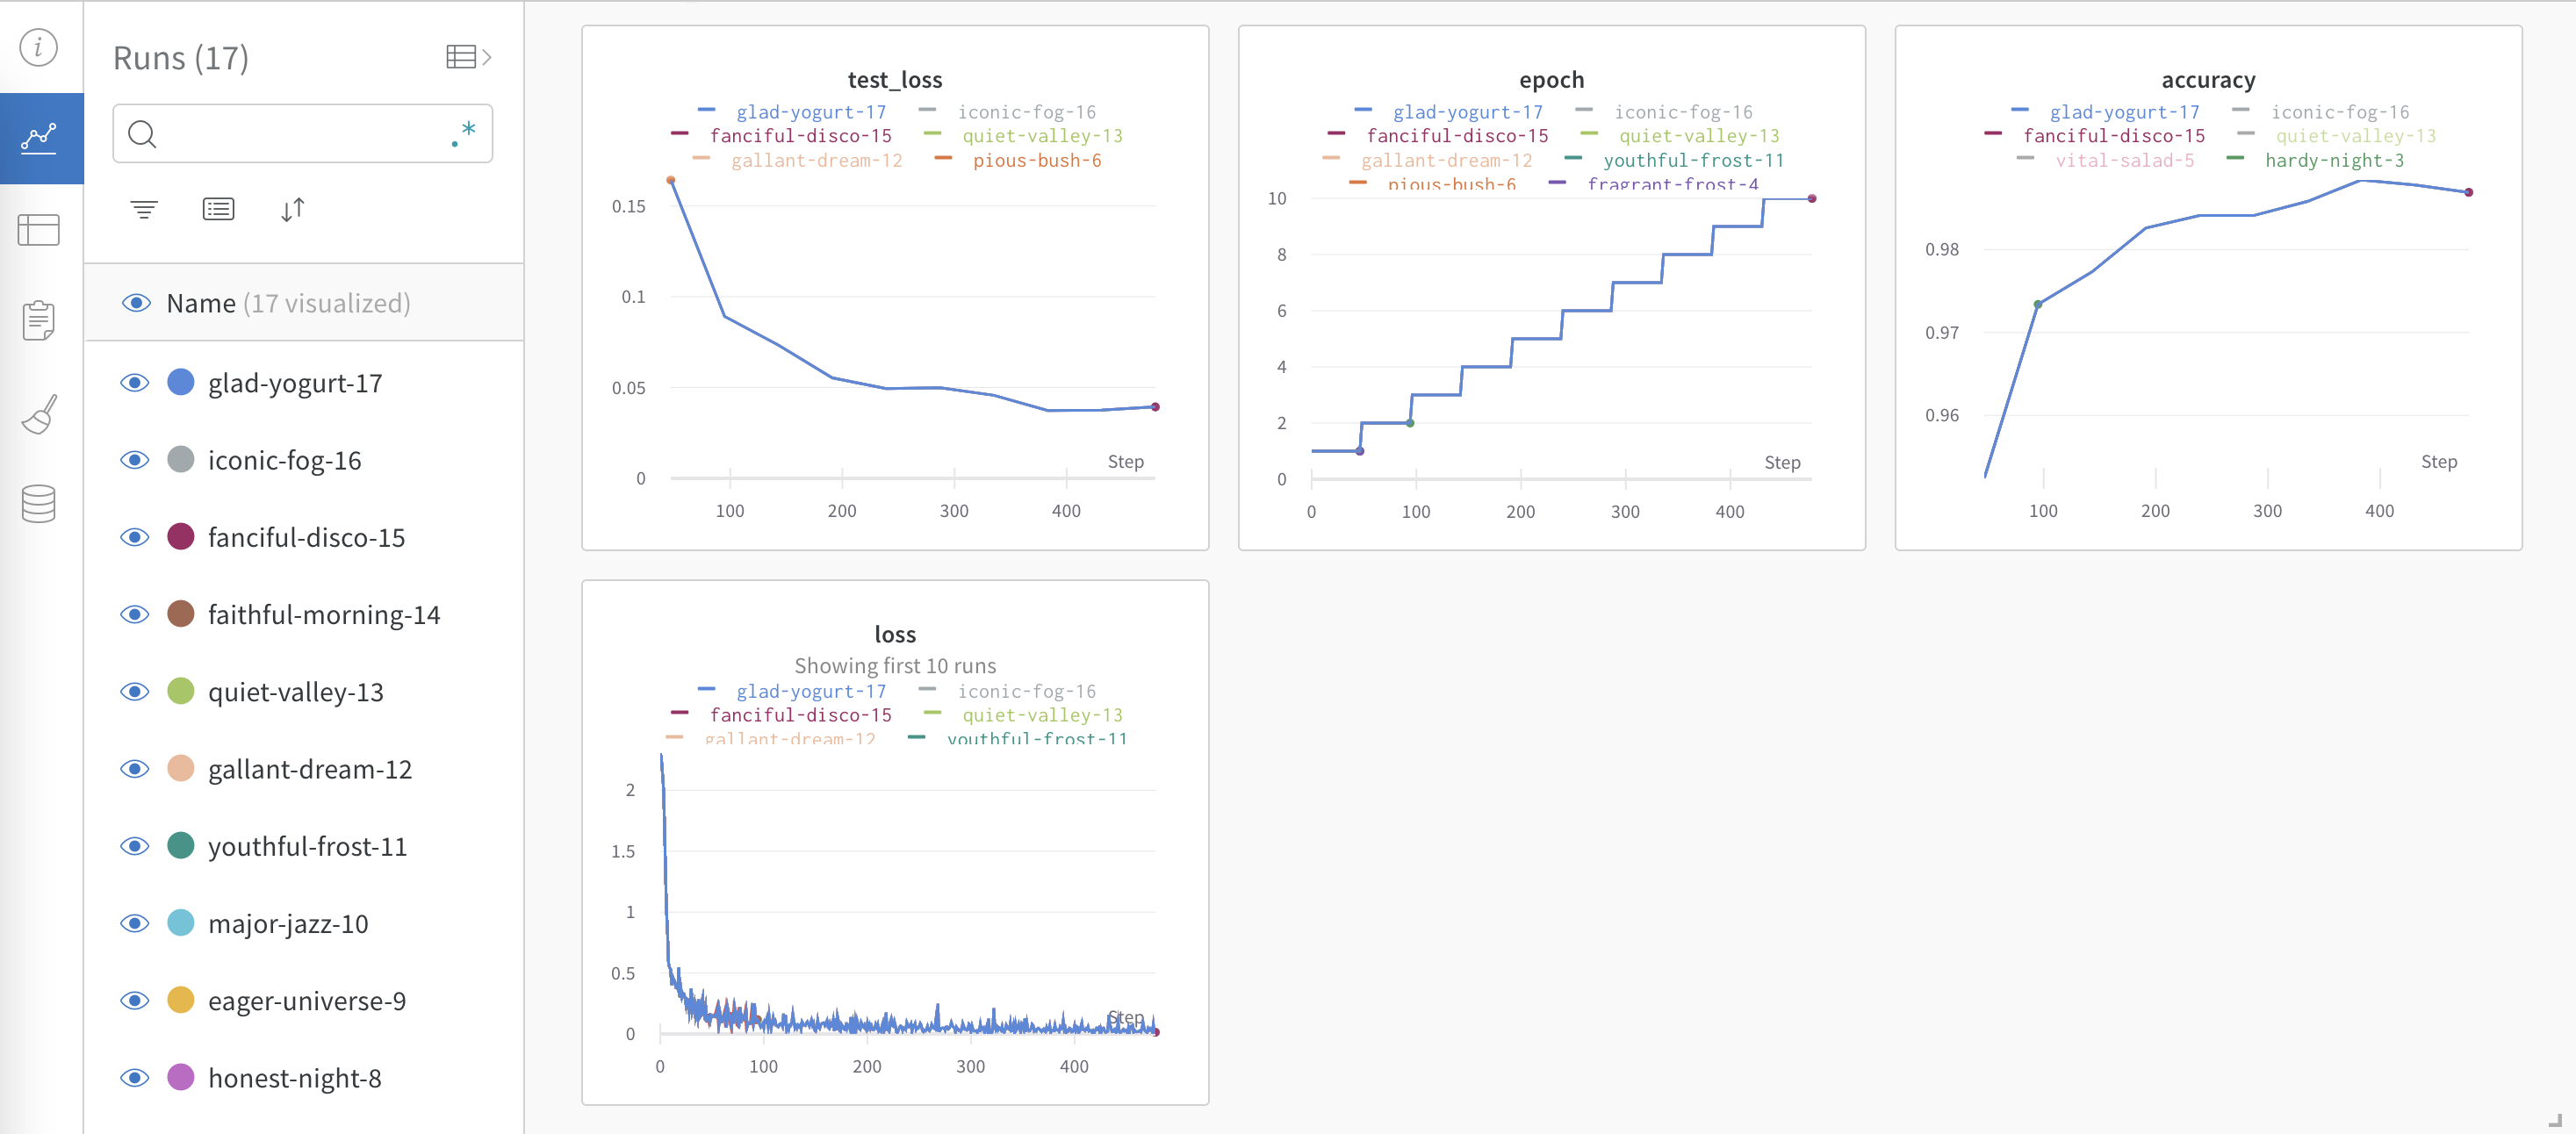
Wandb Graphs
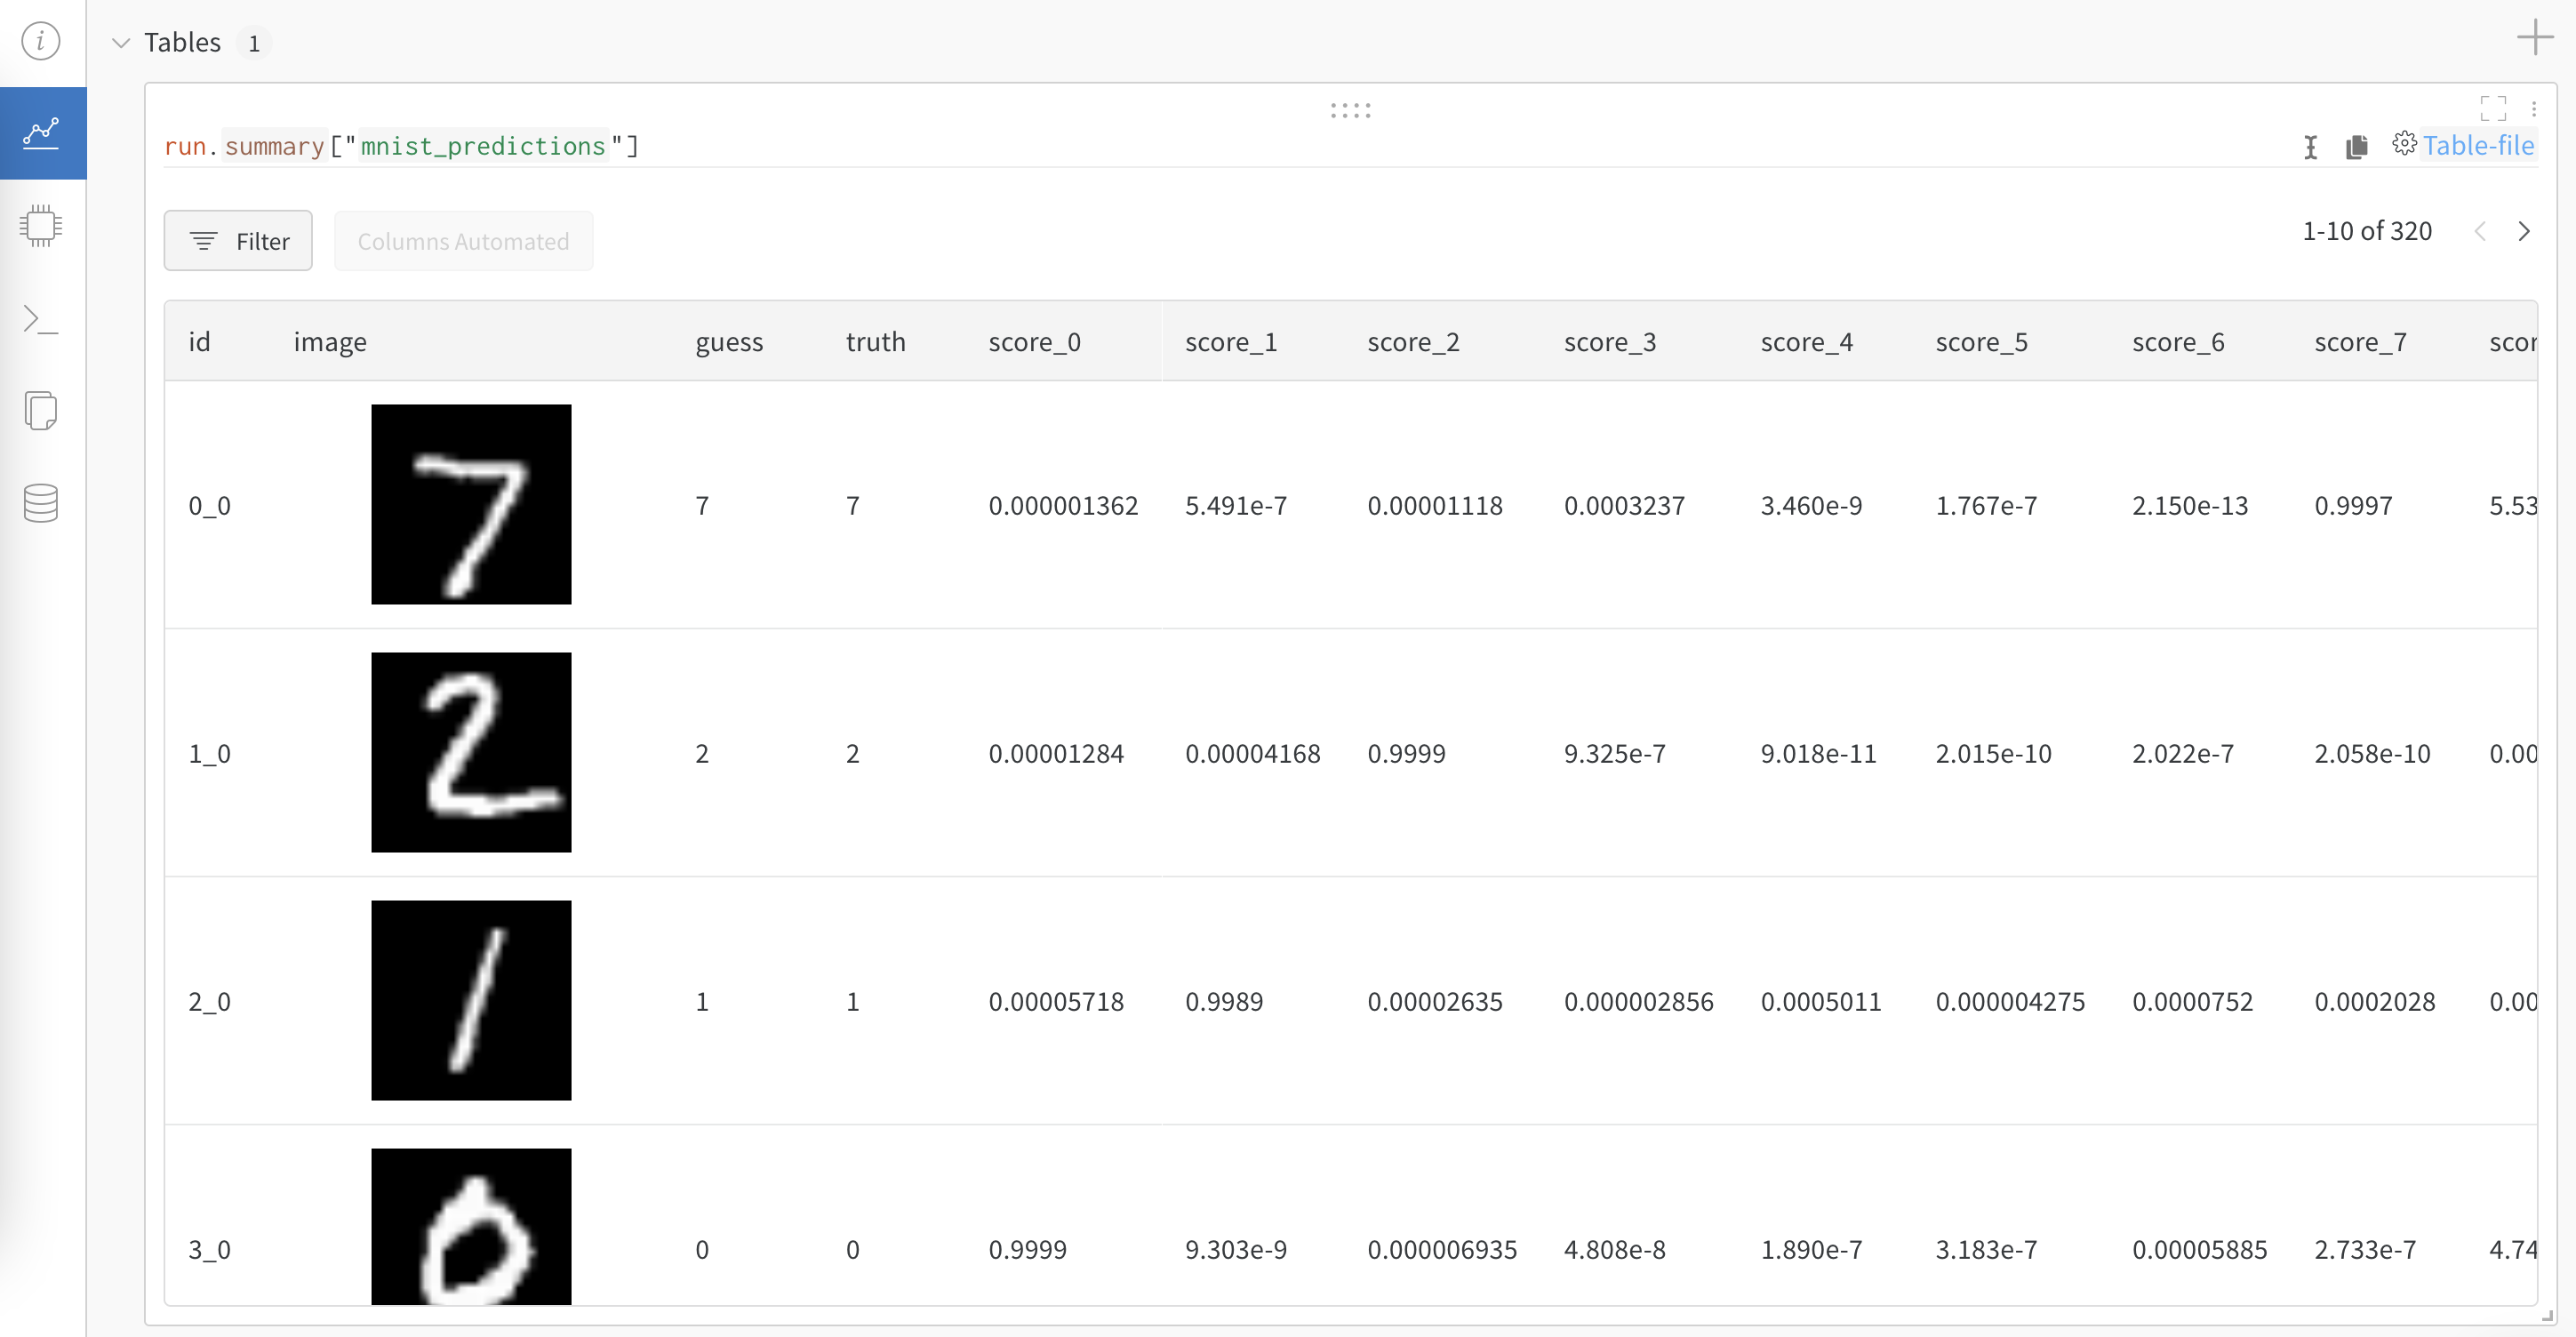
Wandb Table
You can refer to the complete wandb report here.
Tip
A lot more customizations can be done to the report according to your requirement!