Registering workflows
In this guide, you’ll learn how to package and register (that is, deploy) your tasks and workflows to a Flyte cluster. This will enable you to scale your workloads with larger memory and compute requirements, schedule your workflows to run on a pre-defined cadence, and leverage the Flyte backend plugins like Spark.
Prerequisites
This guide assumes that you:
Have a local Flyte cluster running with
flytectl demo startas described in “Running workflows locally” guide.Followed the Creating a Flyte project guide to create a minimal Flyte project.
Custom dependencies
If you have custom Python dependencies, update the requirements.txt file that
ships with the project template
and those changes will be incorporated into the Docker image.
You can also update the Dockerfile (if using a Dockerfile) or the ImageSpec configuration if you want to use a different base image or if the additional Python dependencies require installing binaries or packages from other languages.
Registration patterns
There are different methods of registering your workflows to a Flyte cluster where each method fulfills a particular use case during the workflow development cycle. In this section, we’ll cover the commands you need to fulfill the following use cases:
Iterating on a single workflow script.
Iterating on a Flyte project with multiple task/workflow modules.
Deploying your workflows to a production environment.
The following diagram provides a summarized view of the different registration patterns:
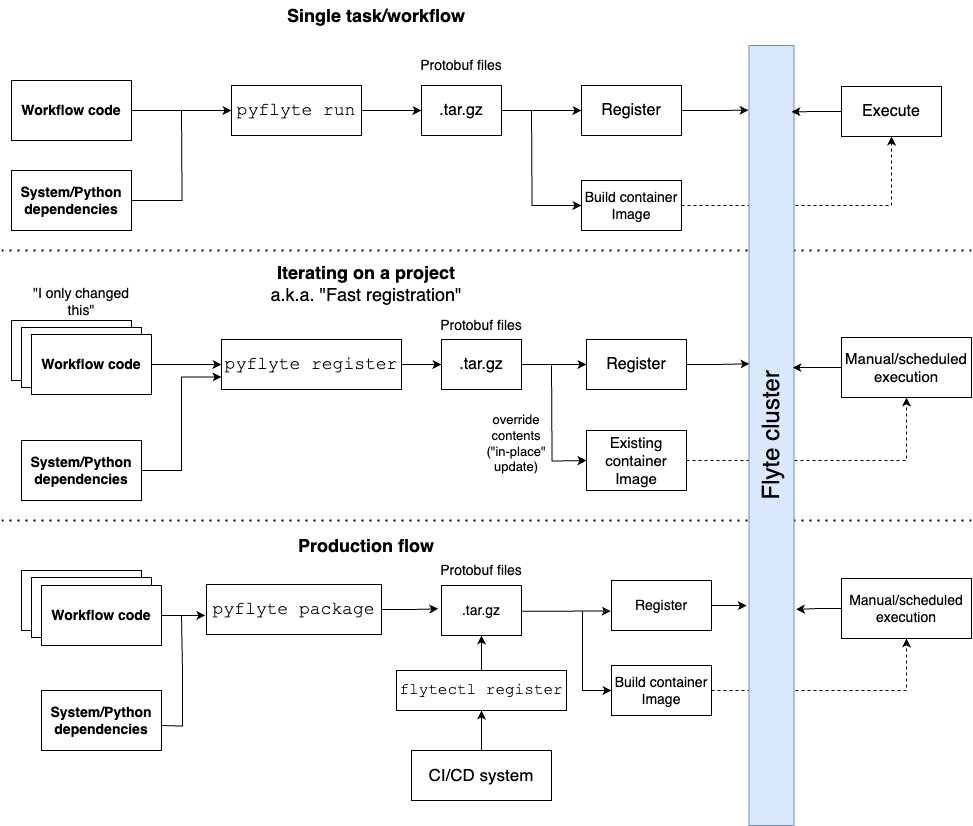
Iterating on a single task or workflow
The quickest way to register a task or workflow to a Flyte cluster is with the
pyflyte run CLI command. Assuming that you’re inside the my_project directory
that we created in Creating a Flyte project,
you can invoke it like so:
pyflyte run --remote workflows/example.py wf --name "Gilgamesh"
Expected Output: A URL to the workflow execution on your demo Flyte cluster:
Go to http://localhost:30080/console/projects/flytesnacks/domains/development/executions/<execution_name> to see execution in the console.
Where <execution_name> is a unique identifier for the workflow execution.
pyflyte run will not only register the specified workflow wf, it will also
run it with the supplied arguments. As you can see from the expected output, you
can visit the link to the Flyte console to see the progress of your running
execution.
Note
pyflyte run supports Flyte workflows that import any other user-defined modules that
contain additional tasks or workflows.
Iterating on a Flyte project
One of Flyte’s benefits is its functional design, which means that you can import and reuse tasks and workflows like you would Python functions when you organize your code into meaningful sets of modules and subpackages.
When you move past a single script that contains your workflows, use the
pyflyte register command to register all the tasks and workflows contained
in the specified directory or file:
pyflyte register workflows
Expected Output:
Successfully serialized 4 flyte objects
Found and serialized 4 entities
  Registering workflows.example.say_hello....done, TASK with version sdYMF0jAkhDh_KA1IMAFYA==.
  Registering workflows.example.greeting_length....done, TASK with version sdYMF0jAkhDh_KA1IMAFYA==.
  Registering workflows.example.wf....done, WORKFLOW with version sdYMF0jAkhDh_KA1IMAFYA==.
  Registering workflows.example.wf....done, LAUNCH_PLAN with version sdYMF0jAkhDh_KA1IMAFYA==.
Successfully registered 4 entities
By default, pyflyte register uses a default Docker image
that’s maintained by the Flyte team, but you can use your own Docker image by
passing in the --image flag.
For example, assuming that you want to use the latest Python 3.9 flytekit image, the explicit equivalent to the default image value would be something like:
pyflyte register workflows --image ghcr.io/flyteorg/flytekit:py3.9-latest
Note
You can also specify multiple workflow directories, like:
pyflyte register <dir1> <dir2> ...
This is useful in cases where you want to register two different Flyte projects that you maintain in a single place.
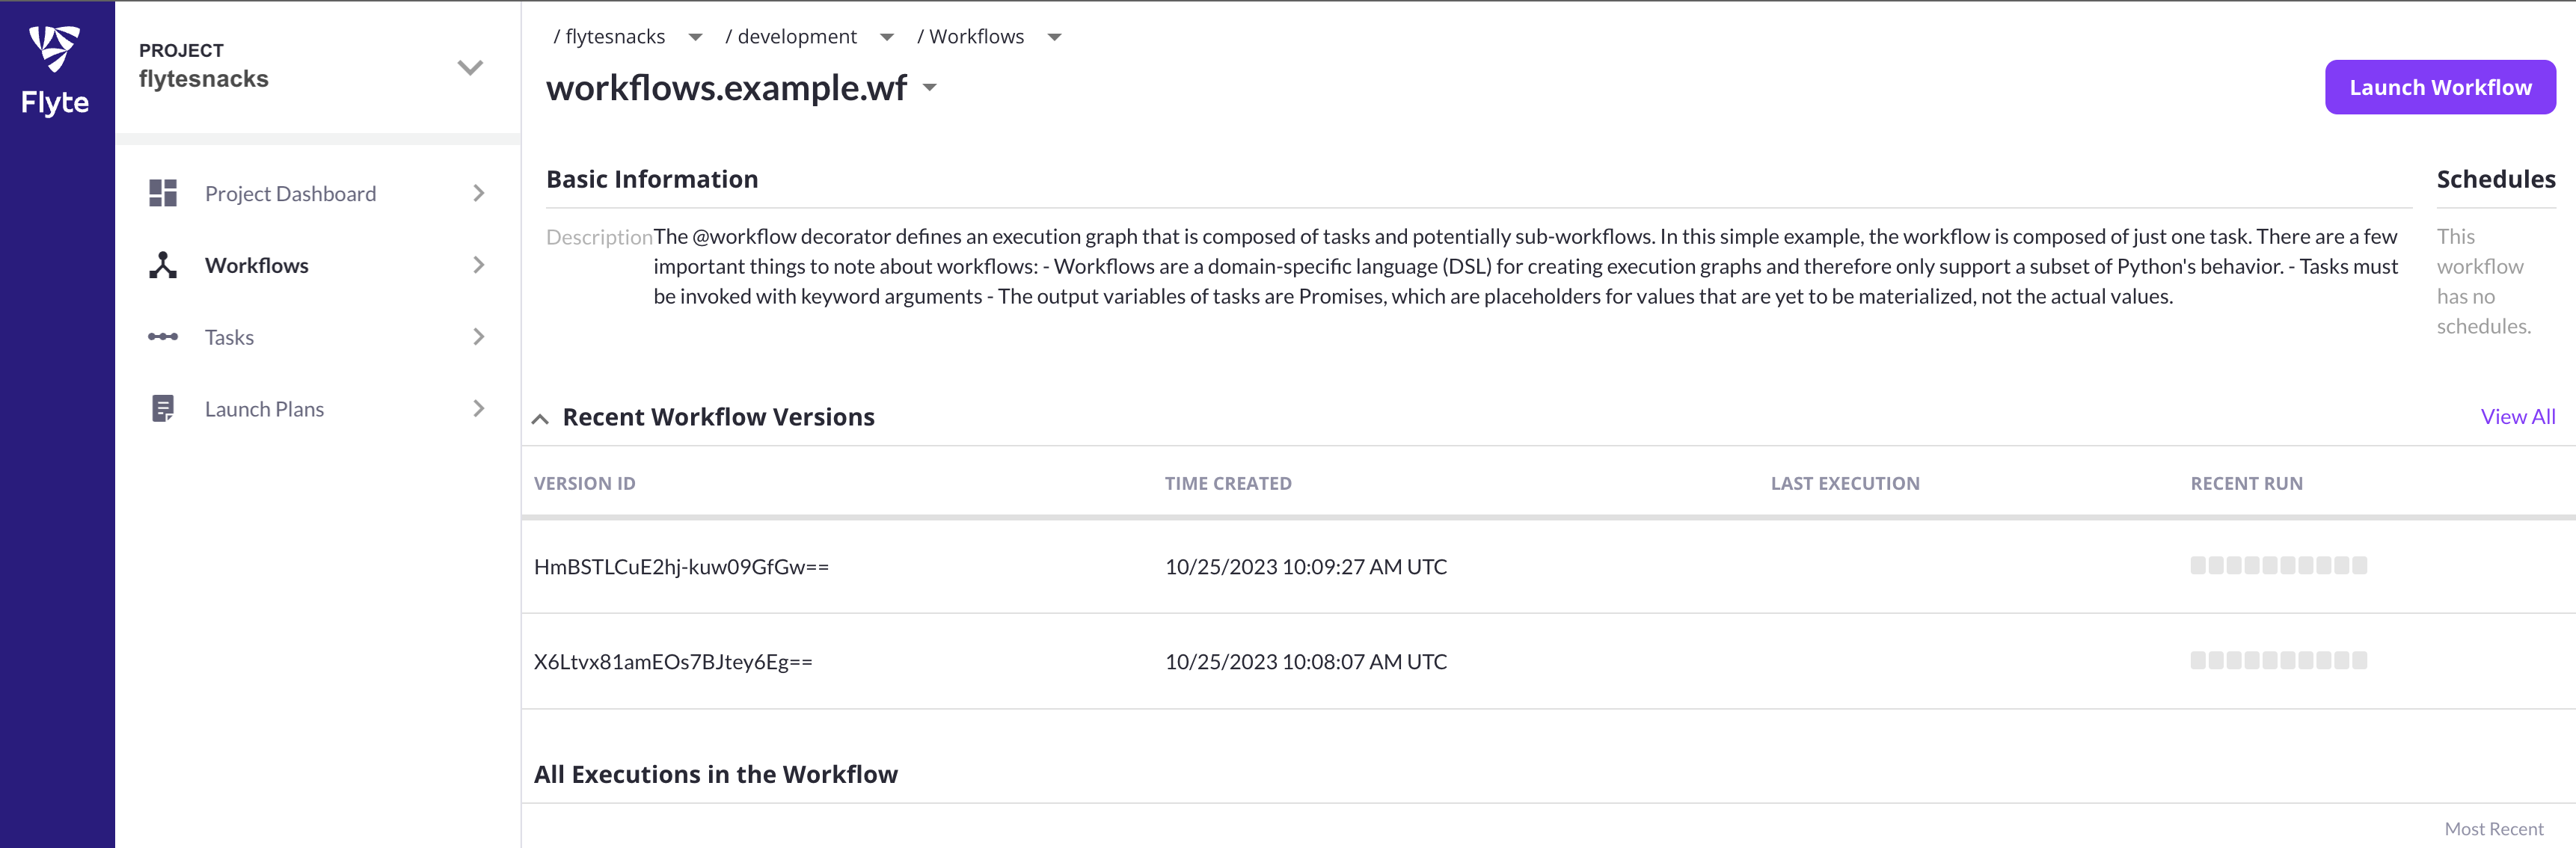
Once you’ve successfully registered your workflows, you can execute them by
going to the Flyte console. If you’re using a local Flyte demo cluster, you can
go to the browser at localhost:30080/console and do the following:
Navigate to the flytesnacks > development domain.
Click on the Workflows section of the left-hand sidebar.
Click on the workflows.example.wf card on the workflows list.
Click on the Launch Workflow button on the top-right corner.
Fill in an input name and click on the Launch button.
Note
In the next guide you’ll learn about how to run your workflows programmatically.
Fast registration
pyflyte register packages up your code through a mechanism called
fast registration. Fast registration is useful when you already have a
container image that’s hosted in your container registry of choice and you change
your workflow/task code without any changes in your system-level/Python
dependencies. At a high level, fast registration:
📦 Packages and zips up the directory/file that you specify as the argument to
pyflyte register, along with any files in the root directory of your project. The result of this is a tarball that is packaged into a.tar.gzfile, which also includes the serialized task (inprotobufformat) and workflow specifications defined in your workflow code.🚢 Registers the Flyte package to the specified Flyte cluster and uploads the tarball containing the user-defined code into the configured blob store (e.g.
s3,gcs).
At workflow execution time, Flyte knows to automatically inject the zipped up task/workflow code into the running container, thereby overriding the user-defined tasks/workflows that were originally baked into the image.
Ignoring files during fast registration
In step (1) of the fast registration process, by default Flyte will package up all user-defined code at the root of your project. In some cases, your project directory may contain datasets, model files, and other potentially large artifacts that you want to exclude from the tarball.
You can do so by specifying these files in a .gitignore or .dockerignore
file in the root directory of your project.
Productionizing your workflows
Flyte’s core design decision is to make workflows reproducible and repeatable. One way it achieves this is by providing a way for you to bake-in user-defined workflows and all of their dependencies into a Docker container.
The third method of registering your workflows uses two commands:
pyflyte package: packages your tasks and workflows intoprotobufformat.flytectl register: registers the Flyte package to the configured cluster.
This is the production-grade registration flow that we recommend because this method ensures that the workflows are fully containerized, which ensures that the system- and Python-level dependencies along with your workflow source code are immutable.
Containerizing your project
Flyte relies on OCI-compatible containers to package up your code and third-party
dependencies. When you invoke pyflyte init, the resulting template project
ships with a docker_build.sh script that you can use to build and tag a
container according to the recommended practice:
./docker_build.sh
Important
By default, the docker_build.sh script:
Uses the
PROJECT_NAMEspecified in thepyflyte initcommand, which in this case ismy_project.Will not use any remote registry.
Uses the git sha to version your tasks and workflows.
You can override the default values with the following flags:
./docker_build.sh -p <PROJECT_NAME> -r <REGISTRY> -v <VERSION>
For example, if you want to push your Docker image to Github’s container
registry you can specify the -r ghcr.io flag.
Note
The docker_build.sh script is purely for convenience; you can always roll
your own way of building Docker containers.
Once you’ve built the image, you can push it to the specified registry. For example, if you’re using Github container registry, do the following:
docker login ghcr.io
docker push <tag>
Pulling private images
For many projects it’s convenient to make your images public, but in the case that you’re building proprietary images or images that may contain sensitive metadata/configuration, it’s more secure if they’re private.
Learn more about how to pull private image in the User Guide.
Package your project with pyflyte package
You can package your project with the pyflyte package command like so:
pyflyte --pkgs workflows package --image ghcr.io/flyteorg/flytekit:py3.9-latest
Expected Output:
Successfully serialized 4 flyte objects
  Packaging workflows.example.say_hello -> 0_workflows.example.say_hello_1.pb
  Packaging workflows.example.greeting_length -> 1_workflows.example.greeting_length_1.pb
  Packaging workflows.example.wf -> 2_workflows.example.wf_2.pb
  Packaging workflows.example.wf -> 3_workflows.example.wf_3.pb
Successfully packaged 4 flyte objects into /Users/nielsbantilan/sandbox/my_project/flyte-package.tgz
This will create a portable package flyte-package.tgz containing all the Flyte
entities compiled as protobuf files that you can register with multiple Flyte
clusters.
Note
Like pyflyte register, can also specify multiple workflow directories, like:
pyflyte --pkgs <dir1> --pkgs <dir2> package ...
This is useful in cases where you want to register two different Flyte projects that you maintain in a single place.
Register with flytectl register
Finally, register your tasks and workflows with flytectl register files:
flytectl register files \
    --project flytesnacks \
    --domain development \
    --archive flyte-package.tgz \
    --version "$(git rev-parse HEAD)"
Let’s break down what each flag is doing here:
--project: A project is a Flyte concept for built-in multi-tenancy so that you can logically group tasks and workflows. The Flyte demo cluster ships with a default project calledflytesnacks.--domain: A domain enables workflows to be executed in different environment, with separate resource isolation and feature configurations. The Flyte demo cluster ships with three default domains:development,staging, andproduction.--archive: This argument allows you to pass in a package file, which in this case isflyte-package.tgz.--version: This is a version string that can be any string, but we recommend using the git sha in general, especially in production use cases.
Using pyflyte register versus pyflyte package + flytectl register
As a rule of thumb, pyflyte register works well in a single Flyte cluster where
you are iterating quickly on your task/workflow code.
On the other hand, pyflyte package and flytectl register is appropriate if
you’re:
Working with multiple Flyte clusters since it uses a portable package
Deploying workflows to a production context
Testing your Flyte workflows in your CI/CD infrastructure.
Programmatic Python API
You can also perform the equivalent of the three methods of registration using
a FlyteRemote object. You can learn more
about how to do this here.
CI/CD with Flyte and GitHub Actions
You can use any of the commands we learned in this guide to register, execute, or test Flyte workflows in your CI/CD process. The core Flyte team maintains two GitHub actions that facilitates this:
flyte-setup-action: This action handles the installation offlytectlin your action runner.flyte-register-action: This action usesflytectl registerunder the hood to handle registration of Flyte packages, for example, the.tgzarchives that are created bypyflyte package.
What’s next?
In this guide, you learned about the Flyte demo cluster, Flyte configuration, and the different registration patterns you can leverage during the workflow development lifecycle. In the next guide, we’ll learn how to run and schedule workflows programmatically.