Authenticating in Flyte#
The Flyte platform consists of multiple components. Securing communication between each component is crucial to ensure the integrity of the overall system.
The following diagram summarizes the components and their interactions as part of Flyte’s auth implementation:
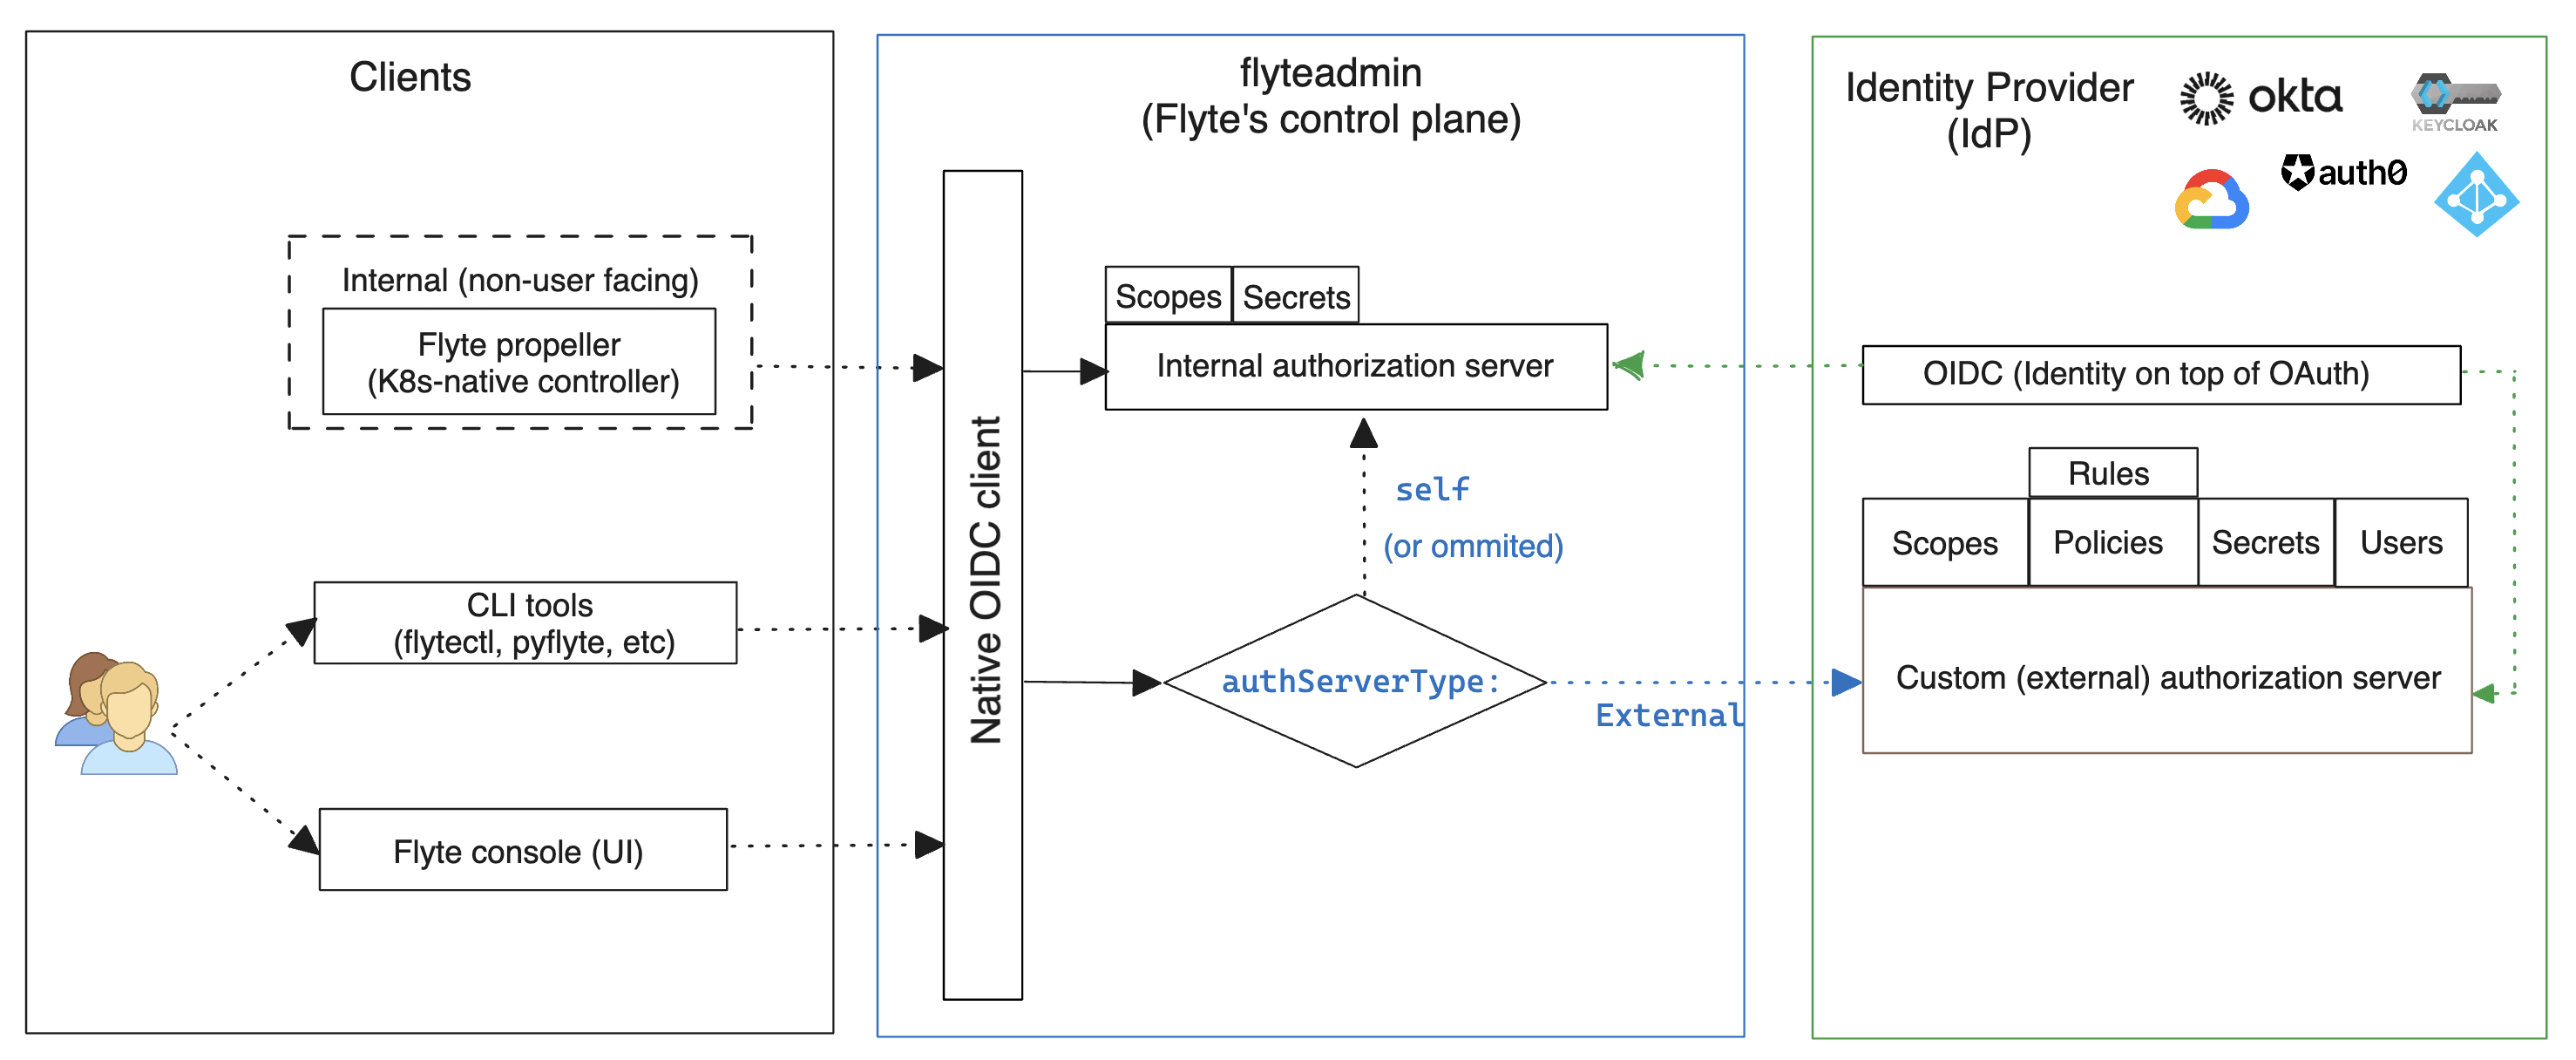
In summary, there are two main resources required for a complete auth flow in Flyte:
An identity layer
Using an implementation of the Open ID Connect (OIDC) specification, it enables clients to verify the identity of the end user based on the authentication performed by an Authorization Server. For this flow to work, you must first register Flyte as a new client (app) to the Identity Provider (IdP).
An authorization server
As defined by IETF’s RFC #6749, the authorization server’s role is to issue access tokens to the client after successfully authenticating the resource owner and obtaining authorization. In this context, the resource owner is the end user of Flyte; and the client is the tool or component that intends to interact with flyteadmin : flytepropeller, flyteconsole or any of the CLI tools.
There are two supported options to use an authorization server in Flyte:
Internal authorization server: It comes pre-installed with Flyte and it is a suitable choice for quick start and testing purposes.
External (custom) authorization server: This a service provided by one of the supported IdPs and is the recommended option if your organization needs to retain control over scope definitions and grants, token expiration policies and other advanced security controls.
Note
Regardless of the type of authorization server to use, you will still need an IdP to provide identity through OIDC.
Authentication Setup#
Prerequisites#
The following is required for non-sandbox (non flytectl demo) deployments:
A public domain name (e.g. example.foobar.com)
Routing of traffic from that domain name to the Kubernetes Flyte Ingress IP address
Note
Checkout this community-maintained guide for more information about setting up Flyte in production, including Ingress.
Identity Providers Support#
Flyte supports OAuth2 and OpenId Connect to secure the various connections:
OpenID Connect: used to secure user’s authentication to
flyteadminthrough the UI.OAuth2: used to secure connections from clients (i.e.
pyflyte,flytectlandflytepropeller) to theflyteadminservice.
Support for these protocols varies per IdP. Checkout the following table to understand the available support level for your IdP:
Feature |
Okta |
Google free |
GCP Identity Service |
Azure AD |
Auth0 |
KeyCloak |
Github |
|---|---|---|---|---|---|---|---|
OpenID Connect (OIDC) |
Yes |
Yes |
Yes |
Yes |
Yes |
Yes |
No |
Custom Auth Server |
Yes |
No |
Yes |
Yes |
? |
Yes |
No |
Identity Management layer : OIDC#
In this section, you can find canonical examples of how to set up OIDC on some of the supported IdPs; enabling users to authenticate in the browser.
Create an OAuth2 Client Credential following the official documentation and take note of the
client_idandclient_secretIn the Authorized redirect URIs field, add
http://localhost:30081/callbackfor sandbox deployments, orhttps://<your-deployment-URL>/callbackfor other methods of deployment.
If you don’t already have an Okta account, sign up for one here.
Create an app integration, with OIDC - OpenID Connect as the sign-on method and Web Application as the app type.
Add sign-in redirect URIs:
http://localhost:30081/callbackfor sandbox orhttps://<your deployment url>/callbackfor other Flyte deployment types.
Optional - Add logout redirect URIs:
http://localhost:30081/logoutfor sandbox,https://<your deployment url>/callbackfor other Flyte deployment types).
Take note of the Client ID and Client Secret
If you don’t have a Keycloak installation, you can use this which provides a quick way to deploy Keycloak cluster on AWS.
Create a realm using the admin console
Create an OIDC client with client secret and note them down. Use the following instructions
Add Login redirect URIs:
http://localhost:30081/callbackfor sandbox orhttps://<your deployment url>/callbackfor other Flyte deployment types.
From the Azure homepage go to Azure Active Directory
From the Ovierview page, take note of the Tenant ID
Go to App registrations
Create a New registration
Give it a descriptive name
For the Supported account types select the option that matches your organization’s security policy
In the Redirect URI section select:
Web platform
Add
http://localhost:30081/callbackfor sandbox orhttps://<your deployment url>/callbackfor other Flyte deployment types
Click on Register
Once created, click on the registered app and go to the Certificates and secrets section
Go to Client secrets and create a New client secret
Enter a description and an expiration policy
Take note of the secret Value as it will be used in the Helm chart
For further reference, check out the official Azure AD Docs on how to configure the IdP for OpenIDConnect.
Note
Make sure the app is registered without additional claims. The OpenIDConnect authentication will not work otherwise, please refer to this GitHub Issue and Azure AD Docs for more information.
Apply OIDC Configuration#
Generate a random password to be used internally by
flytepropellerUse the following command to generate a bcrypt hash for that password:
pip install bcrypt && python -c 'import bcrypt; import base64; print(base64.b64encode(bcrypt.hashpw("<your-random-password>".encode("utf-8"), bcrypt.gensalt(6))))'
Go to your values file and locate the
authsection and replace values accordingly:
auth:
 enabled: true
 oidc:
   # baseUrl: https://accounts.google.com # Uncomment for Google
   # baseUrl: https://<keycloak-url>/auth/realms/<keycloak-realm> # Uncomment for Keycloak and update with your installation host and realm name
   # baseUrl: https://login.microsoftonline.com/<tenant-id>/oauth2/v2.0/authorize # Uncomment for Azure AD
   # For Okta use the Issuer URI from Okta's default auth server
   baseUrl: https://dev-<org-id>.okta.com/oauth2/default
   # Replace with the client ID and secret created for Flyte in your IdP
   clientId: <client_ID>
   clientSecret: <client_secret>
 internal:
   clientSecret: '<your-random-password>'
   # Use the output of step #2 (only the content inside of '')

   clientSecretHash: <your-hashed-password>

 authorizedUris:
 - https://<your-flyte-deployment-URL>
Save your changes
Upgrade your Helm release with the new values:
helm upgrade <release-name> flyteorg/flyte-binary -n <your-namespace> --values <your-values-file>.yaml
Where:
<release-name>is the name of your Helm release, typicallyflyte-backend. You can find it usinghelm ls -n <your-namespace>
Verify that your Flyte deployment now requires successful login to your IdP to access the UI (
https://<your domain>/console)For
flytectl/pyflyte, make sure that your local config file ($HOME/.flyte/config.yaml) includes the following option:
admin:
  ...
  authType: Pkce #change from the default `clientCred` to enable client auth without using shared secrets
  ...
Generate a random password to be used internally by flytepropeller
Use the following command to generate a bcrypt hash for that password:
pip install bcrypt && python -c 'import bcrypt; import base64; print(base64.b64encode(bcrypt.hashpw("<your-random-password>".encode("utf-8"), bcrypt.gensalt(6))))'
Take note of the output (only the contents inside ‘’)
Store the
client_secretprovided by your IdP in a Kubernetes secret as follows:
kubectl edit secret -n <flyte-namespace> flyte-admin-secrets
Where flyte-namespace is the Kubernetes namespace where you have installed Flyte.
Add a new key under
stringData:
apiVersion: v1
# Add from here
stringData:
  oidc_client_secret: <client_secret from the previous step>
# End here
data:
...
Save and close your editor.
Go to your Helm values file and verify that the
configmapsection include the following, replacing the content where indicated:
configmap:
  adminServer:
    server:
      httpPort: 8088
      grpcPort: 8089
    security:
      secure: false
      useAuth: true
      allowCors: true
      allowedOrigins:
 # Accepting all domains for Sandbox installation
        - "*"
      allowedHeaders:
        - "Content-Type"
    auth:
      appAuth:
        thirdPartyConfig:
          flyteClient:
            clientId: flytectl
            redirectUri: http://localhost:53593/callback
            scopes:
              - offline
              - all
        selfAuthServer:
          staticClients:
            flyte-cli:
              id: flyte-cli
              redirect_uris:
              - http://localhost:53593/callback
              - http://localhost:12345/callback
              grant_types:
                - refresh_token
                - authorization_code
              response_types:
                - code
                - token
              scopes:
                - all
                - offline
                - access_token
              public: true
            flytectl:
              id: flytectl
              redirect_uris:
                - http://localhost:53593/callback
                - http://localhost:12345/callback
              grant_types:
                - refresh_token
                - authorization_code
              response_types:
                - code
                - token
              scopes:
                - all
                - offline
                - access_token
              public: true
            flytepropeller:
              id: flytepropeller
     # Use the bcrypt hash generated for your random password
              client_secret: "<bcrypt-hash>"
              redirect_uris:
                - http://localhost:3846/callback
              grant_types:
                - refresh_token
                - client_credentials
              response_types:
                - token
              scopes:
                - all
                - offline
                - access_token
              public: false

      authorizedUris:
      # Use the public URL of flyteadmin (a DNS record pointing to your Ingress resource)
        - https://<your-flyte-deployment-URL>
        - http://flyteadmin:80
        - http://flyteadmin.flyte.svc.cluster.local:80
      userAuth:
        openId:
       # baseUrl: https://accounts.google.com # Uncomment for Google
       # baseUrl: https://login.microsoftonline.com/<tenant-id>/v2.0 # Uncomment for Azure AD
         # For Okta, use the Issuer URI of the default auth server
         baseUrl: https://dev-<org-id>.okta.com/oauth2/default
         # Use the client ID generated by your IdP
         clientId: <client_ID>
         scopes:
           - profile
           - openid
Additionally, outside the
configmapsection, add the following block and replace the necessary information:
secrets:
  adminOauthClientCredentials:
 # -- If enabled is true, helm will create and manage `flyte-secret-auth` and populate it with `clientSecret`.
 # If enabled is false, it's up to the user to create `flyte-secret-auth`
    enabled: true
  # Use the non-encoded version of the random password
    clientSecret: "<your-random-password>"
    clientId: flytepropeller
Note
For multi-cluster deployments, you must add this Secret definition block to the values-dataplane.yaml file. If you are not running flytepropeller in the control plane cluster, you do not need to create this secret there.
Save and exit your editor.
Upgrade your Helm release with the new configuration:
helm upgrade <release-name> flyteorg/flyte-binary -n <your-namespace> --values <your-values-file>.yaml
Verify that the flytepropeller, flytescheduler and flyteadmin Pods are restarted and running:
kubectl get pods -n flyte
For flytectl/pyflyte, make sure that your local config file (
$HOME/.flyte/config.yaml) includes the following option:admin: ... authType: Pkce #change from the default `clientCred` to enable client auth without using shared secrets ...
Note
Congratulations!
It should now be possible to go to Flyte UI and be prompted for authentication. Flytectl should automatically pickup the change and start prompting for authentication as well. If you want to use an external OAuth2 provider for App authentication, please continue reading into the next section.
References#
This collection of RFCs may be helpful to those who wish to investigate the implementation in more depth.
There’s also more detailed information about the authentication flows in the Understanding Authentication.